Jig Saw or how I stopped worrying and learned to love the reciprocation

The first, and only, experience I had with jig saws was using my dad’s vintage craftsman. 

Wholesale stolen from ebay.

It looked pretty much like the one above, but it had the additional “feature” of being able to “steer” the blade via a twisty handle at the top. It was loud, vibrated, and had the cut accuracy of the average user of public restrooms.  I hated using it. 

Fast forward 25 years and I was staring down needing to cut out a 12″ circle from 3″ thick poplar for my first staked furniture build.  I don’t have a capable bandsaw so my choices were rigging something up with a router or cutting it with a coping saw.  Neither was a great option for me (i have router phobia). 

I was wandering through the big box store and they happened to have a Bosch jigsaw on discount. Two minutes of in-store tool review searching and I picked up the JS470E and took it home. It stated on the box that it had 4″ hardwood cutting capacity, so I hoped that a a 33(.3333333…)% overcapacity would mean that it would actually work. I thought that I could at least get it close and then clean it up. It worked ao much better than I had expected. 


The saw easily handled the poplar and left a clean (and square) cut. Took less than 10 mins to zip out the blank above and that included clanping and unclamping from the workbench.  Technology has most certainly advanced in the last few years. 

Don’t fear freehanding a circle too. Draw your line and just cut. You can always fair it out with a plane and spokeshave later. Even with a bandsaw you’ll have to do something to clean up the saw marks. And your circle diesn’t have to be perfect, just good enough to fool the eye.  

Twisting in the Wind

The space between projects is always an interesting one. There’s a sense of disorientation, for me at least, and a little bit of loss.  When you’ve been focused on the provess and goal for a long time, being without that focus can be disorienting. Since finishing  the nail cabinet, I decided to work on some essential hand woodworking layout and reference tools to fill the gap between larger projects.  The first up was a short straight edge from a scrap of maple I had lying around from my moxon vise build. I decided to make a couple of thumbnail ends and an ogee-like shape at the top for a finger hold. 


I cut these with a coping saw and then used a couple of rasps to clean up the shape.  I have a nicholson rat-tail and a Narex half-round. Both of which work fine and aren’t that expensive. I did further cleanup with some metal files.  The endgrain of this maple responded really well to the file.  Since this straightedge is only 1/4 inch wide you would think a 1/2 chisel would be enough to clean up the long sides. However, I had the best luck with my 2 in wide chisel. I think it let me feel if I was tilting and it also let me skew cut along the length.  

After the profile was shaped, I cut a finger recess with a gouge.  This worked OK, but it wasn’t very straight or even.  I used a curved scraper to straigten and smooth the groove. This was super critical because I couldn’t cut the groove with the gouge without tearing out. Curved scrapers are awesome and can be made from straight scapers with some judicious grinding. 


The next item was some winding sticks. I made these from quartersawn sapele that I picked up at woodcraft.  Not a cheap way to do it, but I wanted some dark wood.   The sticks are frequently triangle shaped because, I think, they are cut from one piece of wood.  That’s how sellers approached his. My wood wasn’t thick enough to do that, so I cut it in half and the ripped the angle. 


I cleaned up the cut on my sticking board, which let me run an angled jointer over this thin stick of wood.  If you haven’t made a sticking board, do it. It’s an incredibly useful piece of kit.  

Then came the inlay of a couple of lighter wood strips. I chose some quartersawn maple for a  nice understated ray fleck.  I defined the inlay recess with marking knives and a cutting gauge and then cleaned out the recess with a sharp chisel. A small router plane might have helped a lot here.  At least made the process faster.  

The inlay material was again cut from the moxon leftovers and then planed down to about 3/32 or so just using my smoothing plane and the bench stop. It was kinda scary planing at the toothed hook with a very thin piece, but as long as you press down hard before planing forward the part stays put. I then glued it into the 1/16 in-deep inlay recess and planed it flush with my block plane after the glue dried. 


There are some gaps, but overall I am pretty stoked with my first inlay attempt. One down side was that the sapele warped a little after gluing. I think the water in the glue caused this and I am hoping it will die down over time. The warp is along the length and doesn’t appear to impair use. Just looks bad. 

This was a lot of fun and a nice exercise in precision planing. Highly recommended. 

Stock Photos

If you asked someone what was is most fun part of woodworking, prepping stock is generally not everyone’s first choice.  While I wouldn’t sign up for a full week of prepping stick with handtools, I’ve found that I actually enjoy establishing a true edge and face.  I don’t have a jointer, so I have to do all the flattening by hand.  There is something satisfying about being able to run your square down an edge and have it all line up.  Makes you feel like you’ve accomplished something significant.

img_5819

I still use my dewalt surface planer to do a lot of thicknessing, but you have to establish a flat face for the planer to work properly.  Like all things in handwork, the stock prepping process is so much easier if your tools are sharp.  Especially in hardwoods.  You can usually muscle through pine.

If prepping your stock by hand seems scary, check out this video that popular woodworking recently posted.  It’s a great step by step for getting it done. Not a huge fan of the intro soundtrack on this video….

The Bay

I have had a reasonable amout of success purchasing tools on ebay. While nothing beats getting to pick up a tool and look it over, being picky online can net you some pretty sweet tools. There will be misfires though. The starrett no92 in the picture below is a notable example. 

Starrett 92 on the left and its cheaper cousin the stanley 58 on the right.

I clearly saw that the spring on the micro adjust was missing, but I thought I could fix that easily. So I picked it up for just over $40.00 shipped.  What I didn’t see was that the quadrant rod was bent and the rod clamp had been seriously distorted. So now I own a nice-ish looking, non-locking compass/paperweight. 

So how do you avoid this? One way is to arm yourself with knowldege. Look at vintage catalogs so you know what parts should be there. There are a couple of sites with freely available scanned catalogs. The Alaskan Woodworker and Blackburn Tools both host many scans from the Rose Tool archive that is now gone from the web. Grab the catalog you want and learn what you’re looking for. This is most useful for planes and other complex tools.  Then arm yourself with a tolerance for dissappointment. You are going to buy some clunkers. Get used to it. 

If the thought of buying trash is distressing to you, then stick to the online sites devoted to user grade tools.  Hyperkitten Tools and Patrick Leach at The Superior Toolworks are two that I buy from and I have never been disappointed by either. 

Here are some other strategies that I have found helpful. If you want a desirable tool, look around at competing manufactuers. The stanley 58 above has 80% of the functionality as the Starrett 92, while routinely selling on ebay for 1/3 the cost.  If a company still makes the tool, it can be cheaper new than used, sometimes. This is particularly true of Starrett and Lie Nielsen. I have seen used versions of normal production tools of both manufacturers go for crazy high prices. Finally, if you see a tool that is going for way less than normal, chances are that there is something wrong with it and the more experienced buyers are staying away. Exceptions to rule include situations with mispellings and clear mislabelings.  

Burnish this

Last year sometime, James posted a review of a birdcage awl by Chris Black on his blog The Daily Skep. I wasn’t in the market for an awl at that point, but Chris makes several other tools and sells rehabbed old user tools as well.  If you’re in the market for something, check out what he has on craigslist.

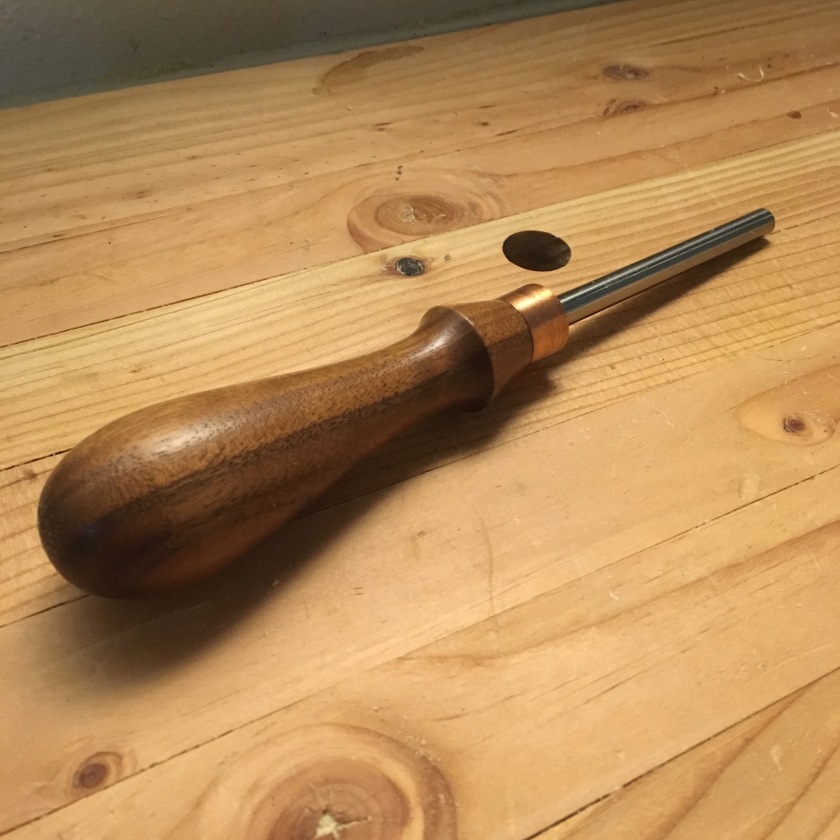
While I didn’t need an awl, I did need a burnisher.  Craig has some nice ones that use a hardened M2 tool steel bar.  A quick hop over to the AZO Materials website, which is a great place if you ever need some quick and dirty material properties, told me that the bar should be close to 60 HRC in hardness.  That’s pretty hard.  So I ordered one.

img_5732

It’s a great looking tool.  The handle is nicely turned and the ferrule is the right size to balance the transition. So, instead of using it, I went right to the lab and put it into a hardness tester to see if the hardness was what it was promised to be.

img_5428

The hardness of this burnisher was 61.1 HRC.  That’s hard and should be able to turn a hook on almost anything.  No where near as hard as carbide (90 ish HRC), but more than enough to do the trick.  I’ve used it now to sharpen a few scrapers and it just works.  If you have some sort of crazy hard scraper it might not work, but the old bahco and the two cherries card scrapers I have turn a hook right away.  So if you need a burnisher, you would be hard pressed to go wrong with one from Chris.  Get it here.

As a postscript, I do not suggest hardness testing your burnisher.  The diamond indenter leaves a little raised ridge around the indent that can cause trouble when you’re burnishing. I had to sand it smooth after testing.

Mark it

Growing up, I didn’t really use marking gauges because we built everything with power tools and you tended to use a tape measure or rule. When I started working more with hand tools, I began to understand how important these tools are to success. Reading books, and watching the Woodwright’s shop, showed me that nearly every operation needed this tool. When I started using marking gauges and put away the tape measure, things got much easier. So I’ve put some miles on marking gauges at this point.

img_5716


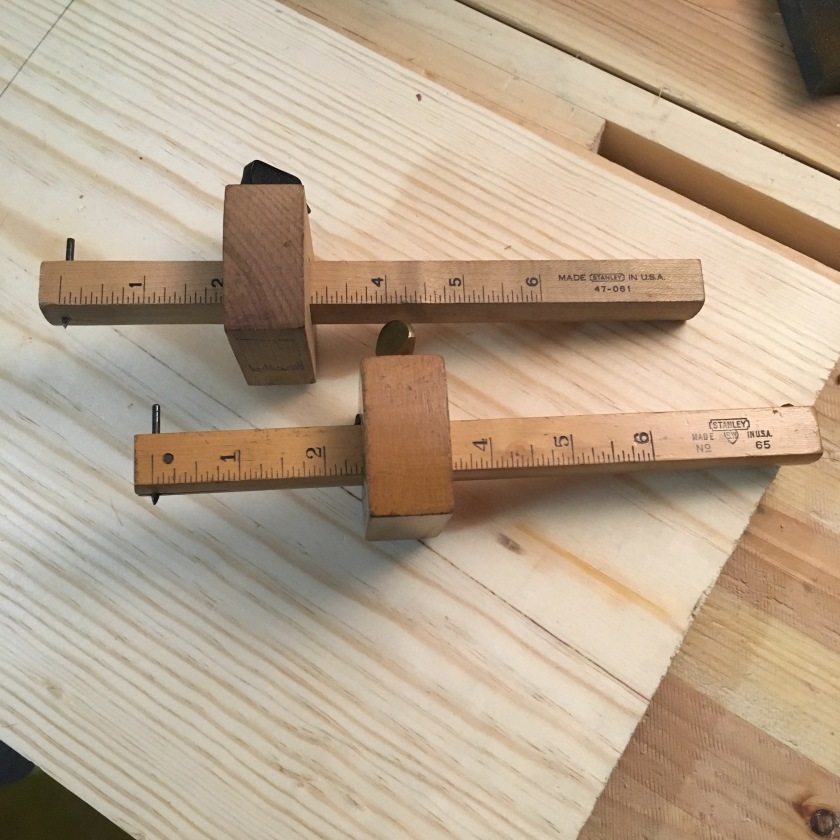
I own both pin and  wheel-type cutting gauges, and I like the wheel gauges a lot, but I find for marking out rip cuts or mortise lines I almost always reach for a pin-style gauge.  They seem to make a clearer line and I am better able to keep them from tracking with the grain. The two pin-style marking gauges above are ones that I use regularly.  The top one was purchased as a birthday gift sometime in the early 1990’s by my parents.  The bottom one was purchased by me on ebay for about the original purchase price of the top one.  Technically, they are not the same gauge, the top is a modern incarnation of the stanley 61 and the bottom gauge is a 65, which cost almost three times as much than the 61. But, they are both very similar, down to the beginnings of knot right at the 4.25″ mark. Both have a square head, rectangular bar, and were made in the USA. The fit of the bar on the older gauge is much tighter than the new gauge, which keeps the head from racking and makes it easier to keep the mark in the right place.

If you are going to make cross-grain lines, I would avoid the pin-style gauges.  They tend to tear out and require some fussy pin sharpening to keep that from happening.  In fact, I generally mark tenons with the wheel type gauges that I own.  These gauges are easy to pick up and are still something that is made relatively well at all price points.  Lurking ebay for a vintage model is probably what I would suggest.  Be picky though, because many have been used and abused.  If you are inclined, you can make your own as well.  Peter Follansbee has some info on his website and there have been a few articles in popular woodworking


On the equivalency of dowels and dominos

I’m trying to keep my natural tendencies to dork out to a minimum here, but no one’s perfect.  So here’s an engineering post. Complete with equations, tables, and words like “stress” and “shear strength.”

I would love to own a festool domino system. Actually, i would love to own a festool anything, but they’re a little out of the current budget. While I was (and am) lusting after this tool, I started thinking about the differences between floating tenon and dowel construction. I have been reading Krenov’s book, The Art of Cabinetmaking, and he is all in on dowels, which is a little surprising.  It’s been drilled into my head that dowels are pretty inferior when it comes to joinery. And I buy this argument, if a joint depends entirely on glue then it probably isn’t the best choice. That being said, the engineer in me experiences a massive bout of cognitive dissonance when I read articles touting floating tenons from people that wouldn’t dowel joint to save their lives. From an engineering standpoint, dowels and floating tenons are the same.

Assuming that the dowels and dominos are made of the same material, there are two factors that determine the strength of the joint. The surface area and the cross sectional area. The surface area is related to glue bond strength. And more is, in general, better. Cross sectional area of the dowel or tenon is related to tensile and shear strength of the joint. Again, more is better. Using this insight, we can create a Dowel and Domino Equivalency ChartTM. The picture below gives us the formulas to calculate the surface areas and cross-sectional areas of an idealized dowel and domino.  

dowel_domino

CA in this image is cross sectional area, SA is surface area and L represents the length of the domino and the dowel (into the screen).  You can see pretty easily that the domino is gonna give you more cross sectional area and surface area for each individual domino.  So the question is, how many dowels do you need?  If we assume that the domino and dowel have the same diameter or thickness D_{dm} = D_d = D and that they have the same length, then we can write the following

Cross Sectional Equivalency
N_{CA} = 1+\dfrac{4W}{\pi D}-\dfrac{4}{\pi}

Surface Area Equivalency
N_{SA} = \dfrac{\pi - 1}{\pi} + \dfrac{W}{\pi D}

These give the following results for typical domino sizes (off the website)

D (mm) W (mm) N_{SA} N_{CA} N
4 17 2 5 5
5 19 2 5 5
6 20 2 4 4
8 22 2 3 3
10 24 1 3 3

So we can see that the cross sectional area drives the number of dowels needed. Interestingly, you never need more than two dowels to get the same gluing area as a domino, but you need as many as 5 to get the same cross-sectional area. So while the “glue joint” should be just as strong if you are talking only about the shear strength of the glue joint, the mechanical strength of the joint will not quite match up. In other words, if you replace one domino with two dowels, the dowels will mechanically fail before the domino would fail. Even though the “glue joint” should be equivalently strong.

None of this takes into account the additional time you would need to drill five holes for dowels, so the domino is probably going to be significantly more efficient than dowels. There is also an underlying assumption that the mechanical fit of the dowels and the dominos are the same. I think this is easy to achieve with good drill bits that are matched to your dowels.

Tl;DR: Believe Krenov. If everyone thinks dowels are trash and dominos are not, then they are wrong. You just need to make sure you have enough dowels.

The importance of being square

I caught the underhill nail cabinet bug as I was finishing the workbench.  Plans are available here. This seemed like a great project, useful, attractive, and challenging. It looks like cabinetry, but is “shop furniture.” I made one change and decided to go with a mortise and tenon door frame with a raised panel.  The cabinet without drawers went together pretty easily.  Covering your carcase dovetails with battens is freeing.

img_5405
There are, of course, several mistakes in this build. Some were simple, like when I put the bottom cleat on the top of the case.  To fix that, I got to test the reversibility of hide glue. Others were not so simple, I miscut the interior eggcrate and got to make two eggcrates. These were both mistakes of inattention, but I think the biggest mistake was not making absolutely, positively certain that everything was square.

While it looks pretty square in the picture above, the carcass isn’t. It’s twisted by about 1/8 of an inch, which created the largest challenges. Adding to the unsquareness, the first eggcrate I made was square, but the replacement was not.

img_5331This project has made me realize how important square is.  If a box is going to go in another box, then the outside box should be square. For example, since eggcrate opening aren’t square, the center drawers have to taper in width to fit the opening. They also have to taper from front to back in height. Sometimes  a lot. Like 3/8 inch a lot. 

img_5588
While none of this is particularly hard to do, it adds 5-10 mins of fitting per drawer. Maybe more. And with 21 drawers, that’s an extra 2 to 3 hours of work. If I had spent the 15-20 mins to make sure all was square to begin with, I could have avoided that extra work.  So check square. And recheck square. And fix if you can.

The Cost of Tools

Right before the LAP forum was shutdown, there was an interesting thread discussion regarding the cost of the Crucible Dividers.  At $120.00, this is not a cheap tool, but they are beautiful and like all things Schwarz and Daed are part of, extremely well-made. I am patiently waiting for the new stock to go live so I can purchase a pair.

divider_product_shot1_img_3461_large
Taken straight from www.crucibletool.com.  Check them out!

The original poster’s main problem with the dividers was that they are priced like a “luxury” tool.  Not sure what they were expecting, but even nice mass-produced dividers cost around $70 a set (starrett 6 inch round leg dividers are 68-61 for a pair), which isn’t exactly cheap.  Especially when you can purchase “dividers” for just a few dollars at several well-known retailers.   (As I was writing this, a video showing how the dividers are made was posted here.  Speaking as an engineer, this process could be scaled, but you would need to make thousands of dividers to bring the cost down. It would probably be hard drive the cost to less than $60 to $80).

The drive to low-cost consumer goods that produced the $8 dividers has skewed everyone’s expectation of price. This simple observation is what I think is the heart of both The Anarchist’s Tool Chest and The Anarchist’s Design Book.  Objectively, low prices are not inherently bad, but when that becomes the primary driving factor the quality tends to suffer as well.  The other factor is that many people look at the “original” cost of similar tools in the stanley hey-day and say, wow!  chisels for $2.70.  Everyone knows that inflation exists, but it’s a rare person who can rattle that number off the top of their head.  That $2.70 chisel is a $22.50 chisel based on the CPI-inflation calculator here.    Not quite the same great deal.  However, a tool-based inflation hedge could work as a retirement strategy. Bed-rock jointer planes sell for basically the original purchase prices on ebay.

IMG_5278.jpg
My alternative to a 401K.

The tools that Crucible, Lie-Nielsen, Veritas, Blue Spruce Toolworks, and a host of other makers build are amazing in terms of quality and thought. These tools blow away the vintage tools in fit, finish, and form.  No plane that came out of the stanley tool-works had the machining tolerances of a Lie-Nielsen or Veritas plane, those tolerances were simply unachievable for the economics of the day.  But, these new planes are about two times the cost of the comparable stanley in real terms, so you do pay for those improvements.  The market for these new makers is probably not the “everyman” that stanley was aiming for.  It seems that a modern commercial woodworker has to be machine-centric to compete with the factory (if that’s even possible) and the handtool-only approach is probably not going to cut it for a house carpenter or someone making a run of furniture.

The bottom line is that a serious amateur can purchase a complete set of top-of-the-line handtools for about the cost of a tablesaw of similar quality*. That’s a strong argument that the “luxury” tools are still a fantastic bargain in terms of functionality per dollar.  Plus these tools are made by people who care.  A lot.  Spending a premium to support someone who is making things, partly, out of a labor of love is something I am totally OK with.

*I am comparing a 3ph 3 HP tablesaw like a powermatic PM2000 or a sawstop cabinet saw.  I would consider these “top of the line” with respect to quality and power. You can definitely find cheaper and this argument becomes more muddled there because of the quality/cost ratio. My tool list and cost breakdown is here for you to rip on.

Vise and Shelf

Holy crap.  I am a lazy blogger.

Since I offset my top a little too much to the right, I was left having to install the face vise on the inside of the left leg.  Not really what I wanted to do, since installing it on the outside would let me clamp against the leg.  The vise is a low-rent chinese model that I purchased from woodcraft for my old bench.  Not super smooth, but it holds.  I also added the deadman, which is made of the last remaining piece of wood from my original bench.  I felt it was a nice touch.  However, boring 8 year old doug pine was a splintery disaster.

img_5051

That’s the raw deadman sitting on the bench, with the two “legs”, before I milled it out.  I then went and added a shelf underneath and put some decorative stopped chamfers on the deadman.  The shelf was simple construction 1X10’s that I got at the home store. They’re shiplapped and then screwed to a 1X1 ledger nailed to the stretchers and the legs.  I put a decorative bead on the shelf.

At this point.  We’re done!  I still have to flatten the top again as the front leg shoulders were slightly proud of the back shoulders and the top slants inward from both the front and back by a little less than a 1/16.

This was a pretty intense process and the home of a lot of firsts.  First mortise and tenon joints and first drawbores.  Not my first glue-ups, but the first with sooo many.  The scale of the joints was physically intense and I was definitely sore after doing this.  Looking forward to making the next project much smaller and lighter.