The Bay

I have had a reasonable amout of success purchasing tools on ebay. While nothing beats getting to pick up a tool and look it over, being picky online can net you some pretty sweet tools. There will be misfires though. The starrett no92 in the picture below is a notable example. 

Starrett 92 on the left and its cheaper cousin the stanley 58 on the right.

I clearly saw that the spring on the micro adjust was missing, but I thought I could fix that easily. So I picked it up for just over $40.00 shipped.  What I didn’t see was that the quadrant rod was bent and the rod clamp had been seriously distorted. So now I own a nice-ish looking, non-locking compass/paperweight. 

So how do you avoid this? One way is to arm yourself with knowldege. Look at vintage catalogs so you know what parts should be there. There are a couple of sites with freely available scanned catalogs. The Alaskan Woodworker and Blackburn Tools both host many scans from the Rose Tool archive that is now gone from the web. Grab the catalog you want and learn what you’re looking for. This is most useful for planes and other complex tools.  Then arm yourself with a tolerance for dissappointment. You are going to buy some clunkers. Get used to it. 

If the thought of buying trash is distressing to you, then stick to the online sites devoted to user grade tools.  Hyperkitten Tools and Patrick Leach at The Superior Toolworks are two that I buy from and I have never been disappointed by either. 

Here are some other strategies that I have found helpful. If you want a desirable tool, look around at competing manufactuers. The stanley 58 above has 80% of the functionality as the Starrett 92, while routinely selling on ebay for 1/3 the cost.  If a company still makes the tool, it can be cheaper new than used, sometimes. This is particularly true of Starrett and Lie Nielsen. I have seen used versions of normal production tools of both manufacturers go for crazy high prices. Finally, if you see a tool that is going for way less than normal, chances are that there is something wrong with it and the more experienced buyers are staying away. Exceptions to rule include situations with mispellings and clear mislabelings.  

Burnish this

Last year sometime, James posted a review of a birdcage awl by Chris Black on his blog The Daily Skep. I wasn’t in the market for an awl at that point, but Chris makes several other tools and sells rehabbed old user tools as well.  If you’re in the market for something, check out what he has on craigslist.

While I didn’t need an awl, I did need a burnisher.  Craig has some nice ones that use a hardened M2 tool steel bar.  A quick hop over to the AZO Materials website, which is a great place if you ever need some quick and dirty material properties, told me that the bar should be close to 60 HRC in hardness.  That’s pretty hard.  So I ordered one.

img_5732

It’s a great looking tool.  The handle is nicely turned and the ferrule is the right size to balance the transition. So, instead of using it, I went right to the lab and put it into a hardness tester to see if the hardness was what it was promised to be.

img_5428

The hardness of this burnisher was 61.1 HRC.  That’s hard and should be able to turn a hook on almost anything.  No where near as hard as carbide (90 ish HRC), but more than enough to do the trick.  I’ve used it now to sharpen a few scrapers and it just works.  If you have some sort of crazy hard scraper it might not work, but the old bahco and the two cherries card scrapers I have turn a hook right away.  So if you need a burnisher, you would be hard pressed to go wrong with one from Chris.  Get it here.

As a postscript, I do not suggest hardness testing your burnisher.  The diamond indenter leaves a little raised ridge around the indent that can cause trouble when you’re burnishing. I had to sand it smooth after testing.

Mark it

Growing up, I didn’t really use marking gauges because we built everything with power tools and you tended to use a tape measure or rule. When I started working more with hand tools, I began to understand how important these tools are to success. Reading books, and watching the Woodwright’s shop, showed me that nearly every operation needed this tool. When I started using marking gauges and put away the tape measure, things got much easier. So I’ve put some miles on marking gauges at this point.

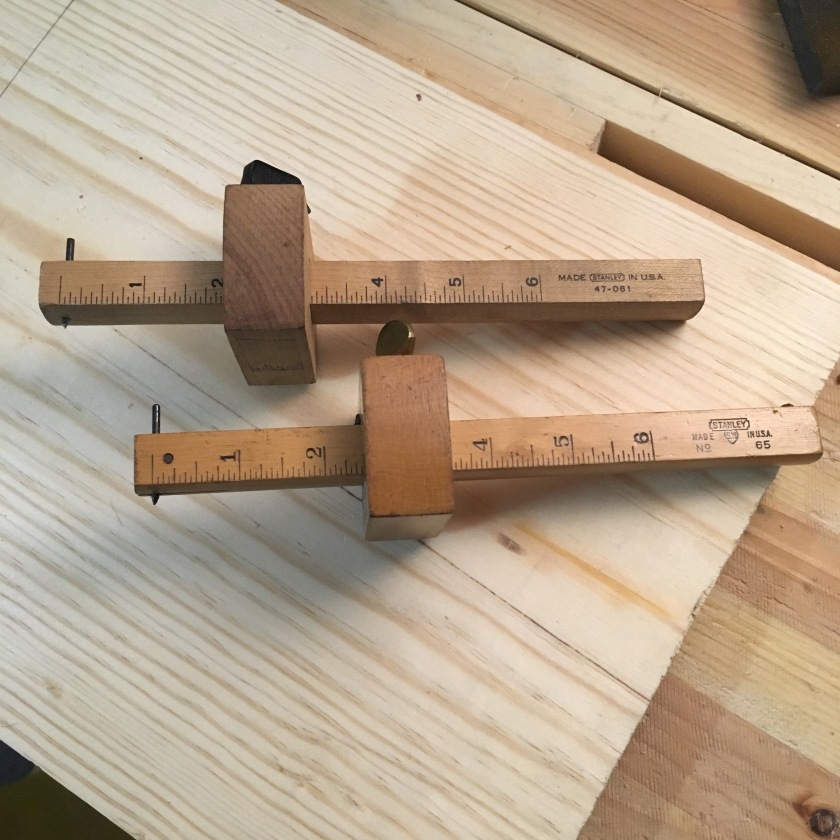
img_5716


I own both pin and  wheel-type cutting gauges, and I like the wheel gauges a lot, but I find for marking out rip cuts or mortise lines I almost always reach for a pin-style gauge.  They seem to make a clearer line and I am better able to keep them from tracking with the grain. The two pin-style marking gauges above are ones that I use regularly.  The top one was purchased as a birthday gift sometime in the early 1990’s by my parents.  The bottom one was purchased by me on ebay for about the original purchase price of the top one.  Technically, they are not the same gauge, the top is a modern incarnation of the stanley 61 and the bottom gauge is a 65, which cost almost three times as much than the 61. But, they are both very similar, down to the beginnings of knot right at the 4.25″ mark. Both have a square head, rectangular bar, and were made in the USA. The fit of the bar on the older gauge is much tighter than the new gauge, which keeps the head from racking and makes it easier to keep the mark in the right place.

If you are going to make cross-grain lines, I would avoid the pin-style gauges.  They tend to tear out and require some fussy pin sharpening to keep that from happening.  In fact, I generally mark tenons with the wheel type gauges that I own.  These gauges are easy to pick up and are still something that is made relatively well at all price points.  Lurking ebay for a vintage model is probably what I would suggest.  Be picky though, because many have been used and abused.  If you are inclined, you can make your own as well.  Peter Follansbee has some info on his website and there have been a few articles in popular woodworking